Guides & Tutorials, Rapid Prototyping
Portable 3D Printer & Laser Cutter
Rapid prototyping equipment, such as 3D printers and laser cutters, have become increasingly more common in the past few years, but few quality solutions exist that can serve both purposes at a low cost. A decent hobby laser cutter may cost thousands of dollars. Even few sub-$1000 3D printers are both durable and capable of producing quality prints.
In my search for such a solution, I came across the new Printrbot Simple. The latest model is almost entirely composed of steel and aluminum with no printed or laser cut parts. The frame of the printer is 3mm matte-black powder coated aluminum, the extruder mount is CNC milled aluminum and even the bearing blocks and belt tensioners are CNC milled aluminum. All of the required parts, including a small roll of 1.75mm filament, are included, but I would recommend carefully checking the package for missing parts upon arrival.
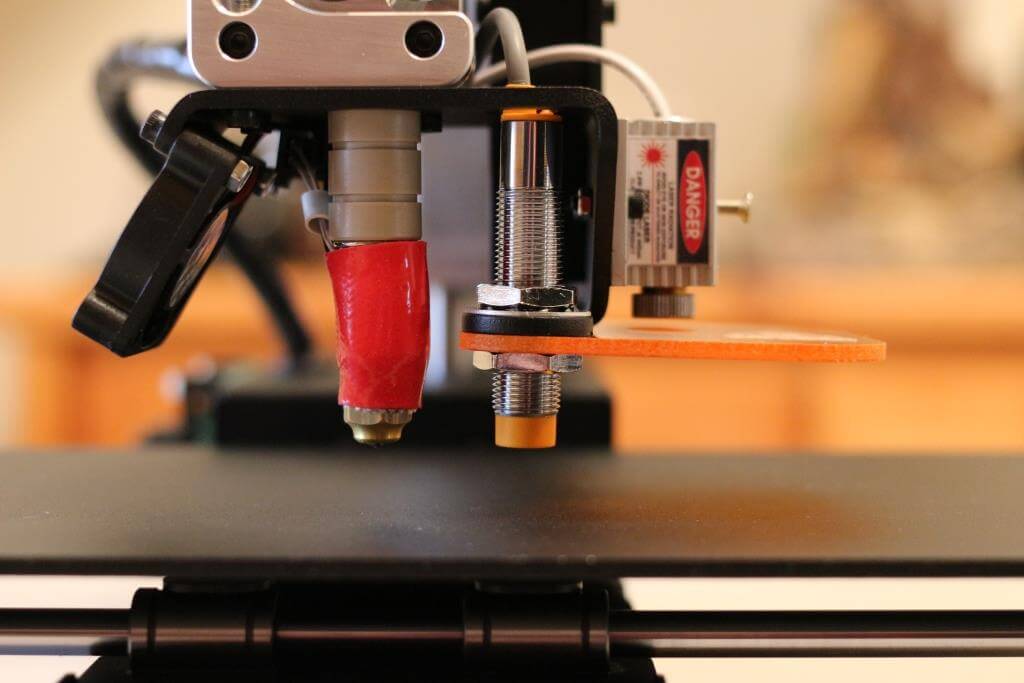
For cutting and engraving, I chose to purchase the 2.8W 445nm laser kit from Jtech Photonics. Jay, with Jtech Photonics, was very helpful in working out all of the details with me. This laser kit uses a solid-state laser diode mounted within a casing through an aluminum heat-sink. My kit shipped with a 2.5A driver, a 40mm cooling fan for the driver, some protective goggles and a sheet of acrylic shielding for blocking out intense reflections at the 445nm wavelength.
Assembly
Before assembling the Printrbot, I used a drill template for placement of the laser and driver holes. If using a hand drill, I highly recommend using some sort of jig to guide the bit and prevent it from slipping across the metal surface. I chose to drill several pilot holes through a couple of wood paint stir sticks which I then clamped to the frame with the pilot hole aligned with the drill template.

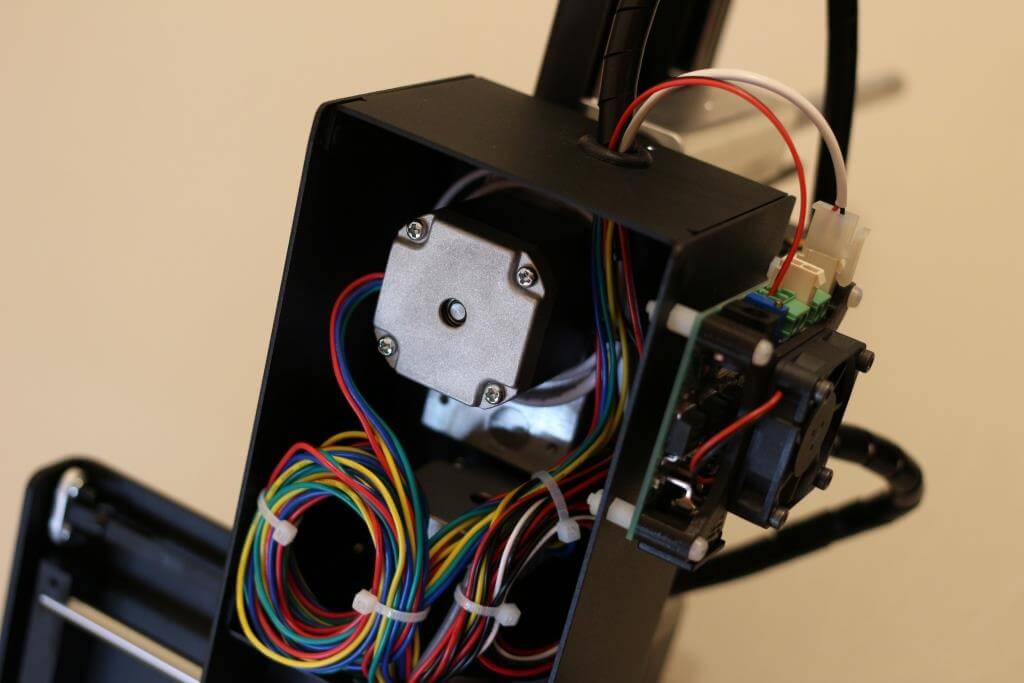
Next, the Printrbot has to be completely assembled. Assembly is quite easy and takes only a couple of hours. Install four M3 5.6x8mm nylon standoffs and M3 nylon nuts onto the frame before assembly. It is important to ensure the alignment of the driver board is correct, but I waited to install the driver until completing the low-profile fan mount. Bolt the laser diode to the side of the upper frame of the Printrbot using two M3x8mm bolts. Prior to bolting the laser on, I applied thermal paste to the back side of the aluminum housing so that excess heat can be adequately dissipated through the frame of the Printrbot. The Printrbot assembly guide should be followed for the remainder of the assembly process.
Cable management takes a fair amount of time, but there is plenty of room for the wires inside of the frame, and the designers have implemented ports at the top and rear for routing cables into the frame. I chose to route the laser cable into the top of the frame with the bundle of extruder cables and out the rear port of the frame to the laser driver. I also chose to splice the wire for the fan into a second cable routed through the frame and out the rear to the input of the laser driver. This is responsible for modulating the laser power via M106 gcode commands.
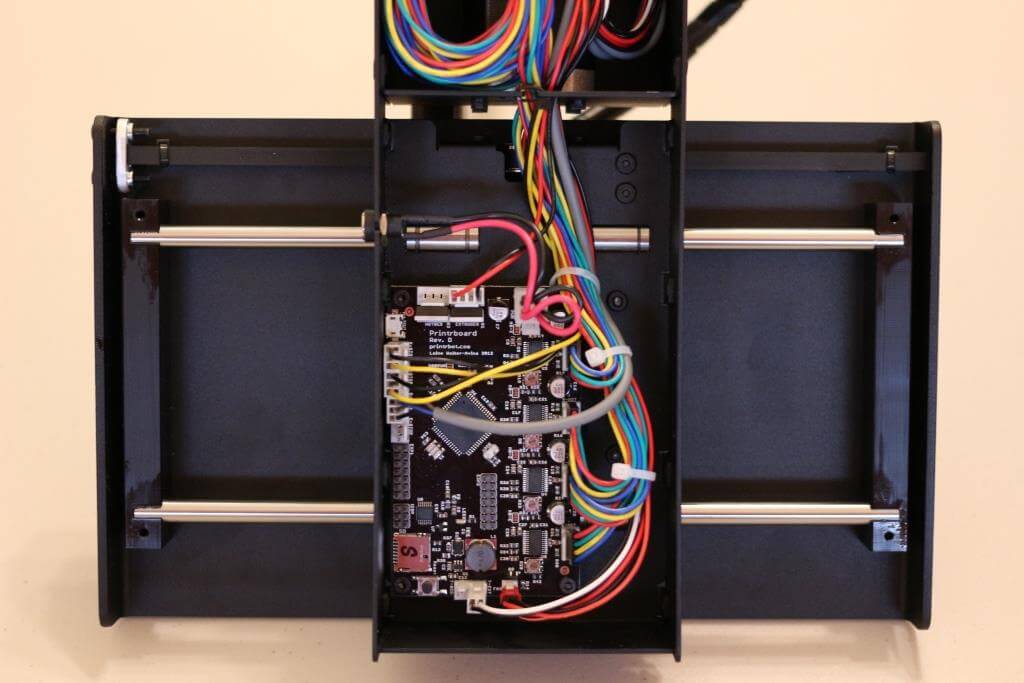
With the assembly of the Printrbot complete and ready to print, I printed a low-profile fan mount for the laser driver. The fan attaches to the mount with four M3x12mm bolts. The bolts should thread tightly into the mount without the need for fasteners on the inside of the mount. The fan mount is placed over the top of the laser driver and fastened to the nylon standoffs using four M3x20mm nylon bolts.
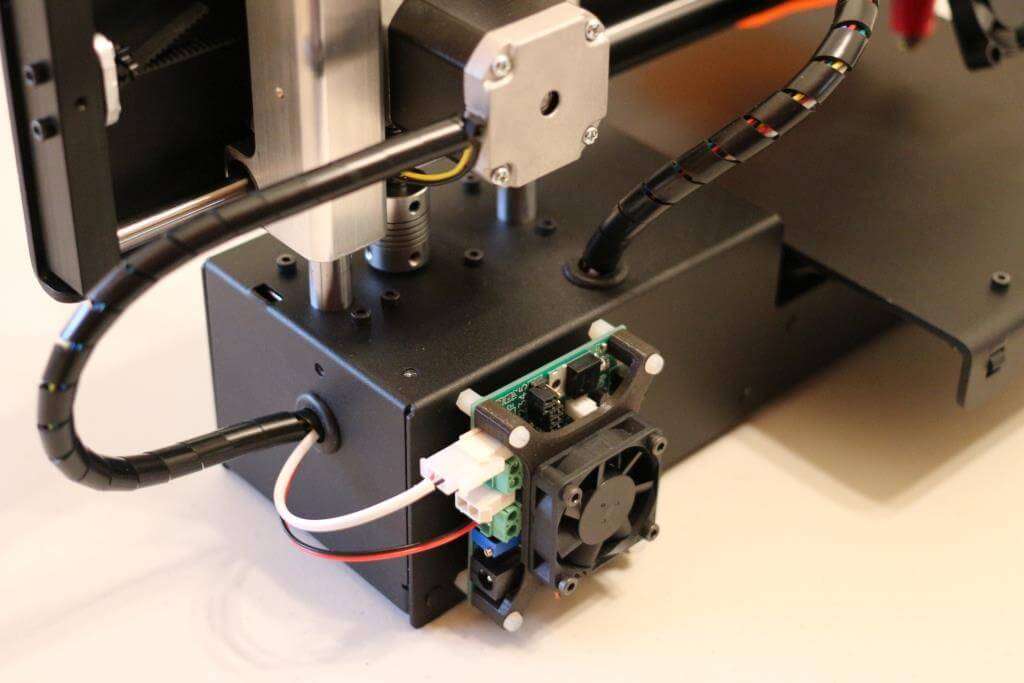
Although power may be supplied to the laser driver using a variety of power sources; Jay, with Jtech Photonics, recommended using the supplied 12 volt power adapter in order to avoid damaging the sensitive laser diode by excessive voltage spikes.
When 3D printing, it is important that the laser driver is switched off, otherwise the laser may turn on during printing.
Cutting and Engraving
To utilize the laser, gcode must be generated from a vector drawing. I have modified the laser engraver plugin for Inkscape to accommodate all of the necessary settings without the need to post process the gcode. Install Inkscape and extract the laser gcode plugin files to ‘\…\Inkscape\share\extensions’.
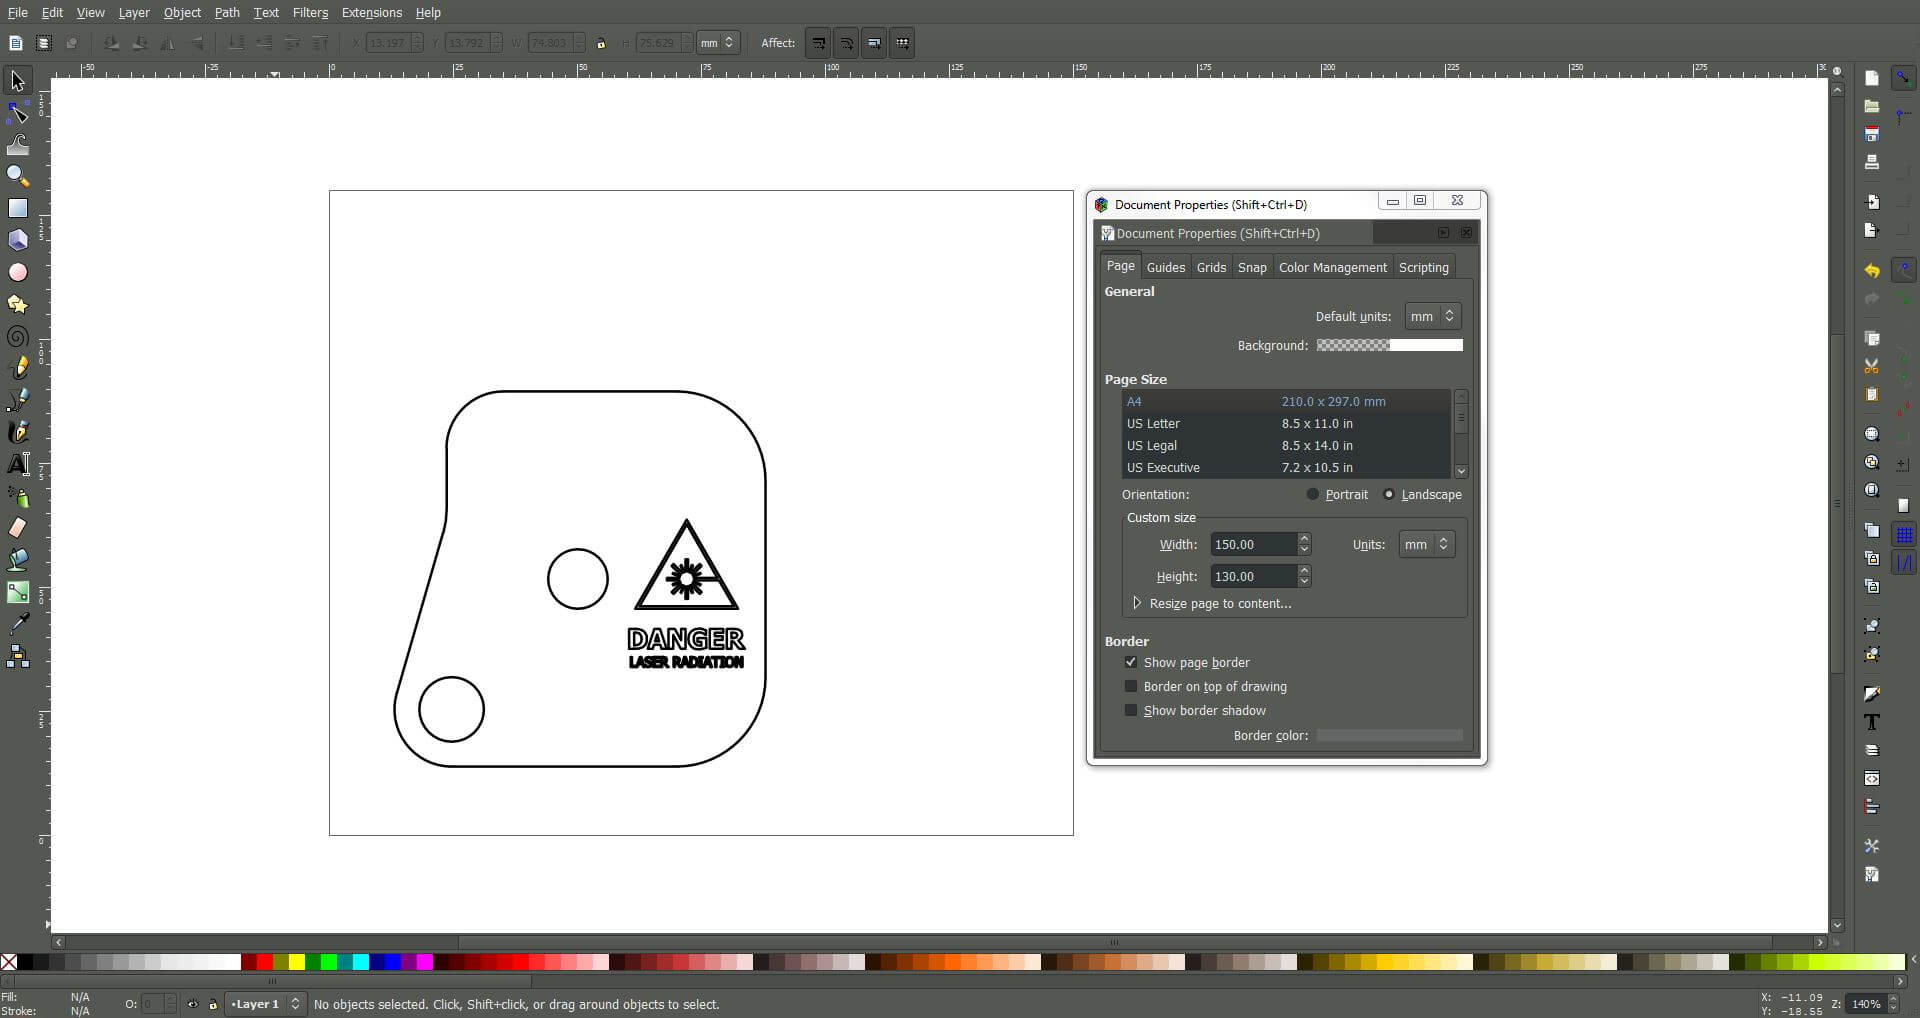
Open Inkscape and select ‘file > document properties’. Set all units to mm, and set a custom document size of 150x130mm (approximately the size of the usable cutting space). Draw or import a vector drawing, such as a .dxf or .pdf file, and position it within the boundaries of the document. To generate the gcode, select ‘Extensions > Generate Gcode > Laser Tool…’. Input the appropriate settings and click apply to generate the gcode file.
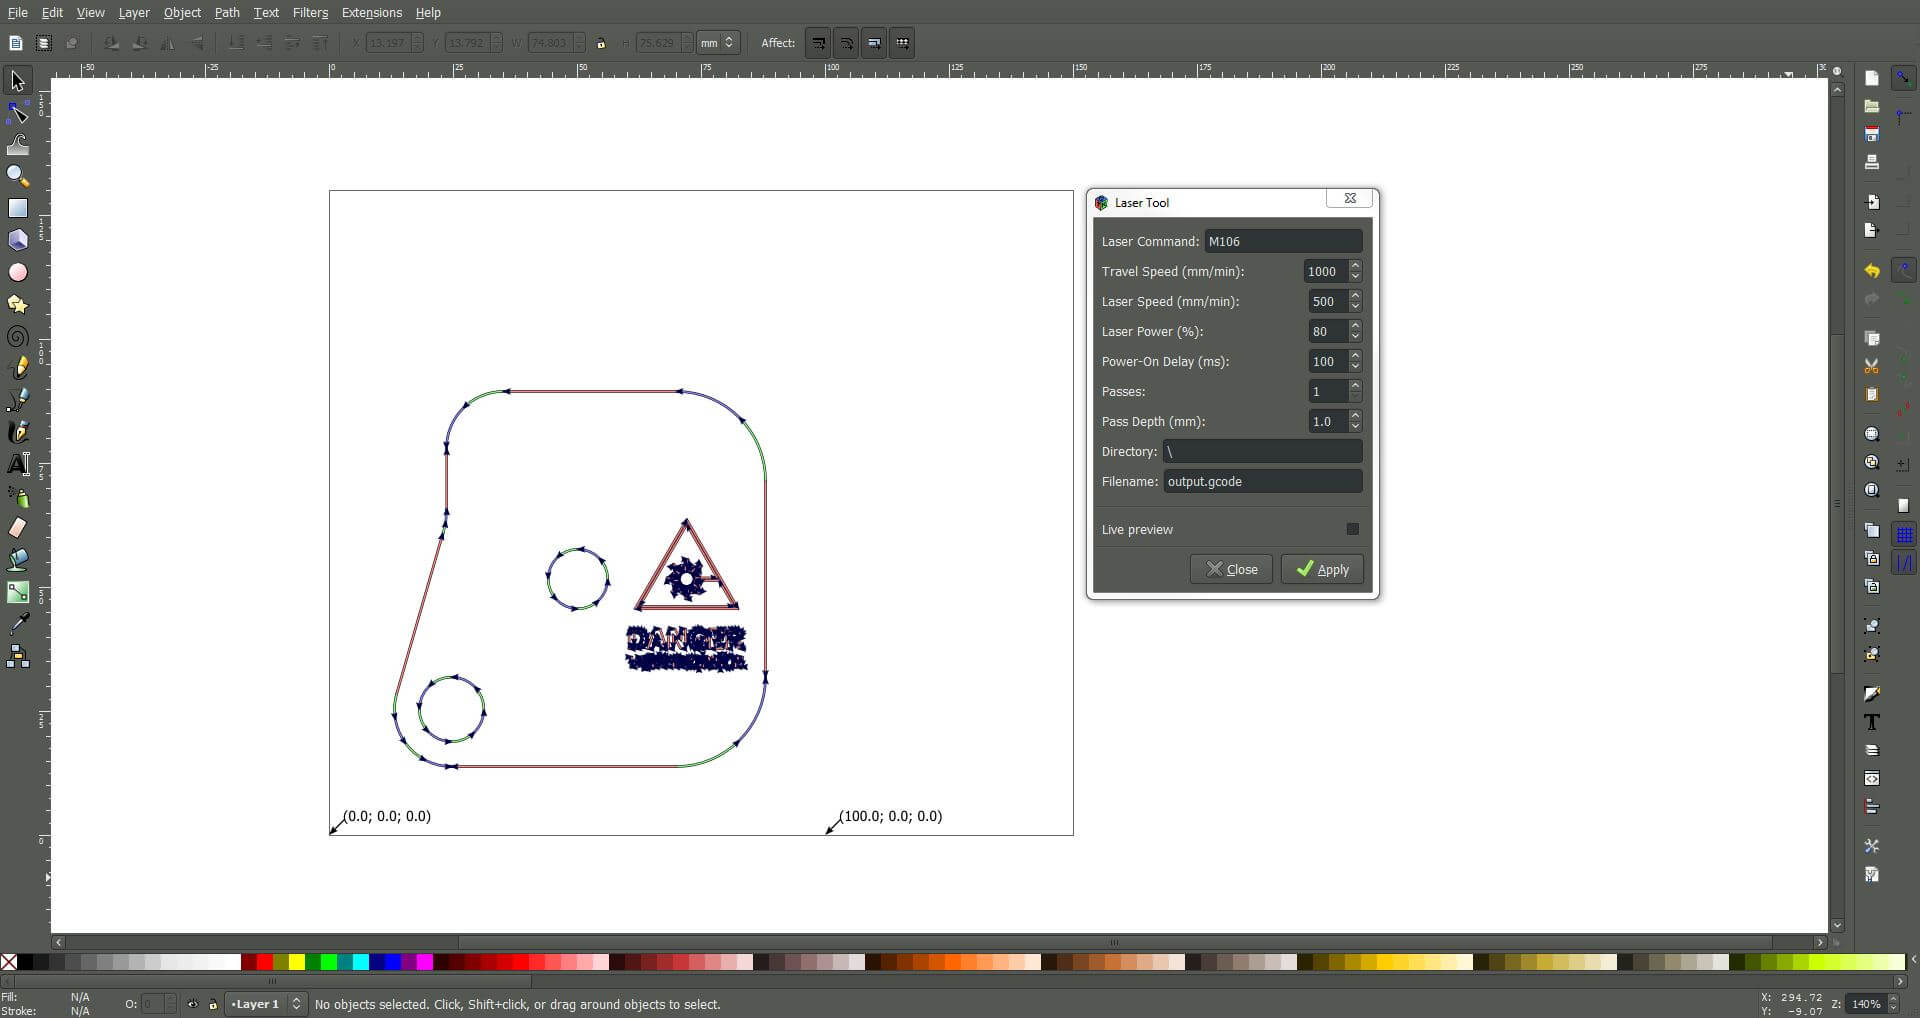
For engraving, a single pass at low power and high speed should be used. For cutting, high power and low speeds should be used with multiple passes. If points deeper in the material between cutting segments fail to melt, it may be necessary to increase the power-on delay. This will ensure that the laser is momentarily held in position at the start of each segment so that gaps do not form between segments as the laser intensity ramps up. However, if pits form at the beginning of each segment when engraving small characters, the power-on delay should be reduced or set to zero.
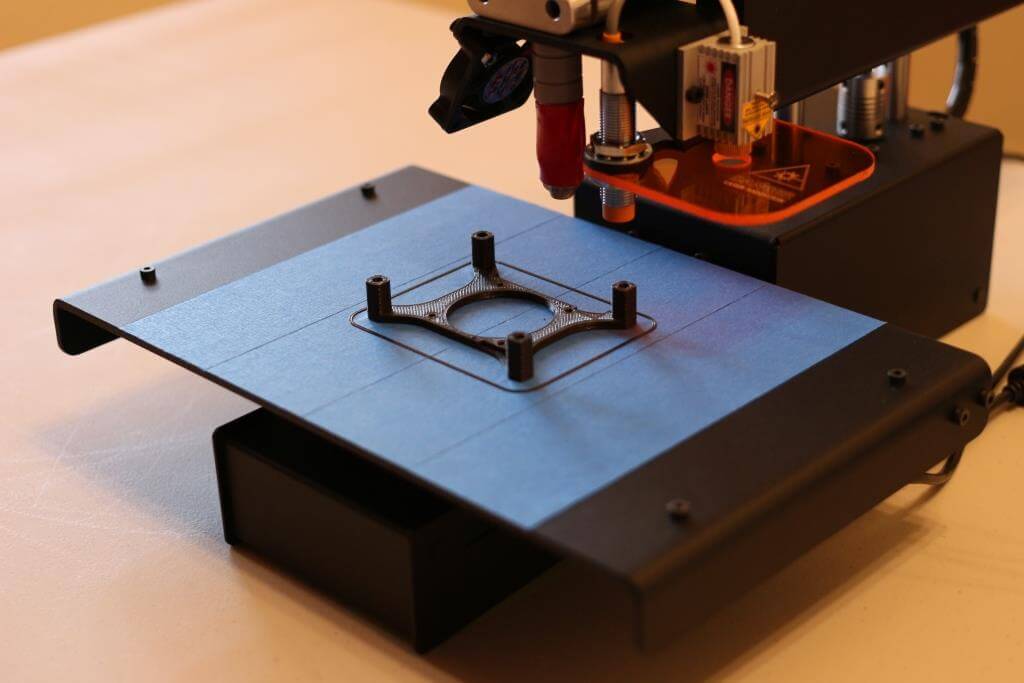
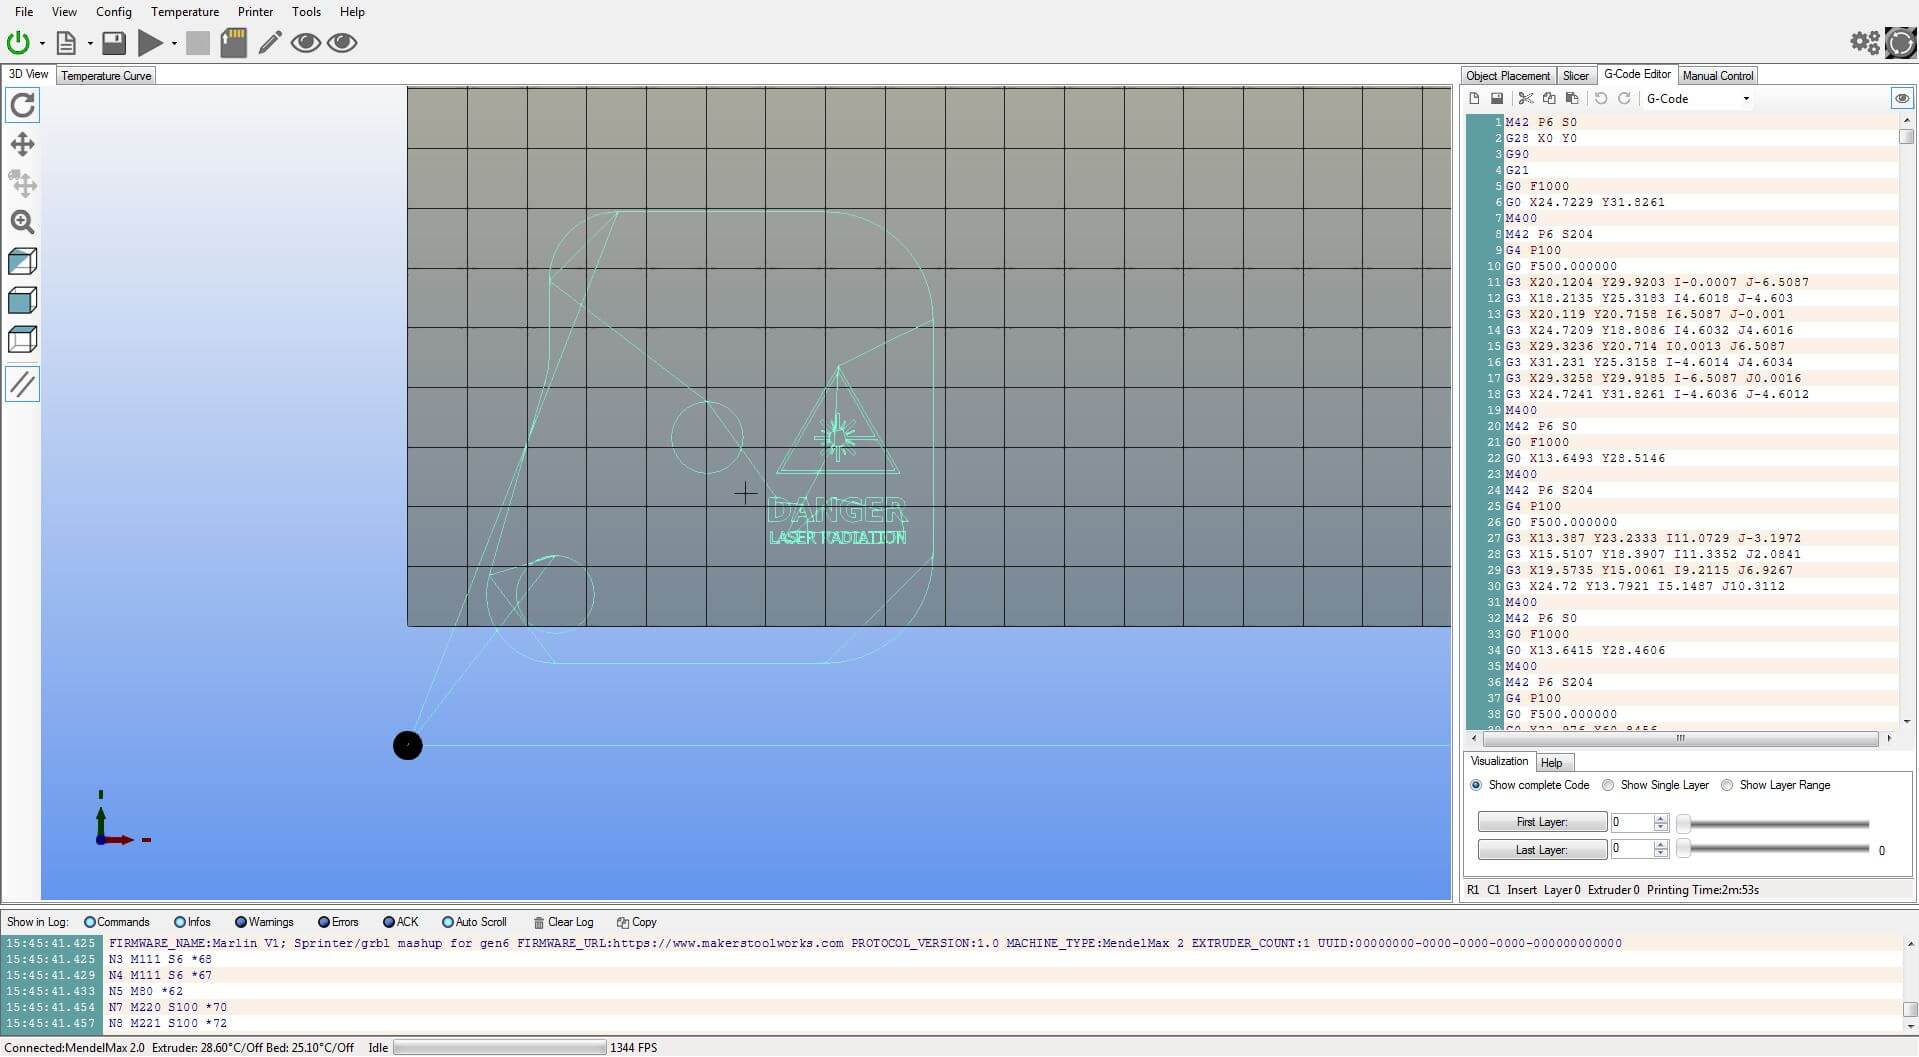
Before cutting, connect to the Printrbot using software such as Repetier Host and home all axes. First raise the print head to 5mm. Ensure the fan is off by issuing the command ‘M106 S0’, or using the slider in Repetier Host. Place a sheet of paper on the bed and power on the laser driver. Slowly turn up the duty cycle of the fan output using the slider or by issuing the command ‘M106 Sxxx’ where ‘xxx’ is the duty cycle ranging from 0 to 255 (100%). This value should only be set high enough to see a spot from the laser without burning the paper. With the z-axis raised 5mm above the bed, focus the laser to a fine point. Once focused, set the duty cycle to zero. If cutting, place a scrap sheet of bare metal beneath the material to protect the bed. Measure the distance from the bed to the top surface of the material and raise the z-axis 5mm above this height. For example, if you place a 0.5mm thick piece of sheet metal beneath a 3mm thick piece of acrylic, the height should be set to 8.5mm so that the focal point of the laser rests on the top surface of the material. Now you may load the gcode and run the job. The x and y axes will home, but the z-axis will remain at the level set before starting the job. The laser will automatically turn on at the set power level when cutting and the focal point will lower by the set depth for each additional pass. It is important not to drive the laser for prolonged periods of time at full power. Check the temperature of the laser and pause the job if necessary to allow for cooling. Decreasing the speed of travel moves will also allow time for the laser to cool between cuts.
Following these instructions, a protective shield may be created from the 3mm acrylic sheet.

Pros
• Inexpensive, less than $1000
• Durable, high quality parts
• Excellent print quality
• Portable
Cons
• No heated print bed
• Small build volume
• Inability to cut thick materials at high speeds

Conclusion
Although the parts are sourced from several independent suppliers, the result is a portable dual purpose rapid-prototyping tool that is professional in appearance, yet inexpensive and great for hobbyists. The print volume is lacking, but capable of printing many practical parts and prototypes. The fact of the matter is that any part which can possibly fill the medium-size bed will likely warp. However, a heater may be purchased from Printrbot and installed to the bed for larger prints, but this requires that the power supply be upgraded to support the power requirements of the heated bed. The quality of the prints are excellent, and I attribute this to the combination of the auto-leveling non-contact bed probe and the Ubis hotend. Purchased as a kit, I did find that my package had been missing a few parts, but Printrbot support was very helpful with replacing them at no additional cost. The design of this Printrbot is excellent, but I recommend checking the part tolerances and the press fit bearings for metal filings, as the quality control can be spotty. For laser cutting, I initially had somewhat low expectations of the laser’s capabilities. Fortunately, I am very surprised by how capable it is. With the laser mounted to the metal body of the Printrbot using thermal compound, I have been able to keep the diode cool at 1.3A (2W) and a 100% duty cycle for at least 25 minutes. I was even more surprised to find that it was capable of cutting a 3mm sheet of acrylic at 2W, with a diode rated for use at up to 2.8W. The downside is that the mounting location of the laser restricts the cutting area to about 150x130mm, and cutting 3mm of acrylic is very slow at 2W, but certainly doable. I find this to be an incredibly useful tool with even further room for improvement of its capabilities. This has been one of the most satisfy projects I have completed to date, and I believe it to be one of the most useful tools in existence per unit of desk space it conveniently occupies.
Update – 8/5/14
After having tested this setup for a couple of months, I have been very satisfied with its functionality. The Printrbot Simple consistently produces much higher quality prints than my Mendel Max 2 with Jhead extruder. I find that the quality is roughly equivalent to a MakerBot Replicator 2. The auto bed-leveling feature is outstanding, and it has worked 100% of the time since I completed the initial calibration two months ago. It is a feature common to much more expensive systems, such as the Stratasys uPrint SE, that sets this $500 3D printer apart from many others on the market.
I have also had some time to experiment with the laser. My laser driver shipped set to operate at about 1.3 amps, which is the setting I have been using for a while now. At 1.3 amps, I have been able to power the diode at 100% power for at least 30 minutes without having the diode heat up at all. I suspect it would be capable of operating for perhaps as much as an hour or more. I recently maxed the current out to about 2.4 amps, and I was even more impressed with the results. At 2.4 amps, the diode does get warm, but after 5 minutes at full power, it was still sufficiently cool to continue operating. Having the diode mounted to the metal frame of the printer has certainly provided adequate cooling for the diode, more than what can be provided by a cooling fan alone.
Update – 12/17/14
I recently installed the upgraded heated bed and handle with spool holder from Printrbot. The bed is built very well and serves as a convenient surface to use the laser on without the risk of etching the coating off the surface of the original bed. Despite placing an order for the heated bed option “Rev D Printrboard – ADD grooved bar end”, I was not shipped a grooved bar end. One of the tapped holes in the aluminum bed was too large and improperly threaded. I had to modify my existing bar end with a groove for the wires, but there was nothing I could do to repair the defective hole. Nevertheless, everything came together quite well, but Printrbot’s quality control has again failed me.
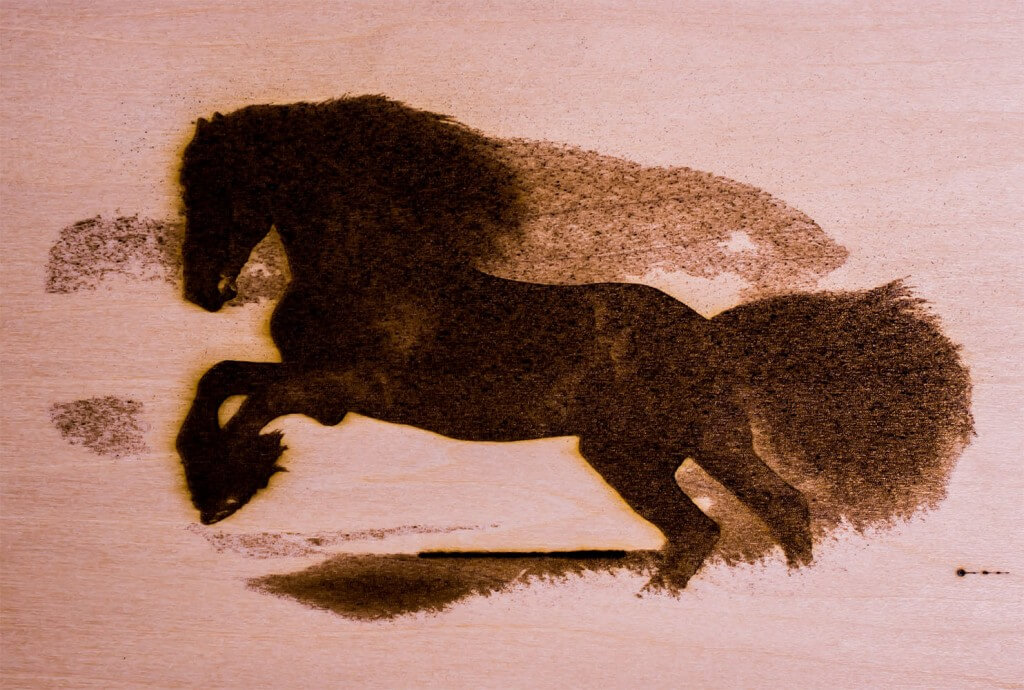
At 2.5 amps I have continued using the laser for jobs in excess of 30 minutes without any issues. I wrote a MATLAB script to export gcode for raster engraving images using the laser. So far, the resulting detail has produced excellent raster engravings in basswood. My MATLAB function pic2laser imports any image, scales it to the bed limits, converts the image to grayscale and exports the paths and laser power to raster the image as gcode from the grayscale image.
pic2laser(inputname, outputname, command, resolution, travel_speed, laser_speed, power, x_lim, y_lim)
For example, to output ‘test.gcode’ from an image ‘test.jpg’ using the laser power command ‘M106’ with a resolution of 100 pixels/cm, travel speed of 5000 mm/min, laser speed of 800 mm/min and laser power of 30% within a 70mm x 70mm bounded area, the command is as follows:
pic2laser('test.jpg', 'test.gcode', 'M106', 100, 5000, 1000, 30, 70, 70)

| Laser Cut (2.4A) | Thickness | Speed (mm/min) | Power (%) | Delay (ms) | Passes | Depth (mm) |
| Basswood | 1/16 in | 120 | 100 | 0 | 1 | 0 |
| Basswood | 3/16 in | 100 | 100 | 0 | 2 | 2.5 |
| Acrylic | 3 mm | 50 | 100 | 100 | 3 | 1 |
| Cardstock | 0.01in | 800 | 100 | 0 | 1 | 0 |
| Balsa | 1/8in | 300 | 100 | 0 | 1 | 0 |
| Laser Cut (1.3A) | Thickness | Speed (mm/min) | Power (%) | Delay (ms) | Passes | Depth (mm) |
| Birch Plywood | 1/64 in | 200 | 100 | 10 | 3 | 0 |
| Acrylic | 3 mm | 75 | 100 | 500 | 6 | 0.5 |
| Cardstock | 0.01in | 400 | 100 | 1 | 1 | 0 |
| Laser Etch (2.4A) | Speed (mm/min) | Power (%) | Delay (ms) | Passes |
| Acrylic | 500 | 20 | 0 | 1 |
| Basswood | 1000 | 30 | 0 | 1 |
| Cardstock | 800 | 50 | 100 | 1 |
| Laser Etch (1.3A) | Speed (mm/min) | Power (%) | Delay (ms) | Passes |
| Acrylic | 500 | 30 | 10 | 1 |
| Polyurethane | 100 | 10 | 0 | 2 |
| Cardstock | 800 | 100 | 100 | 1 |
i cant generate gcodes for laser
below comment appears
please help
Traceback (most recent call last):
File “laser.py”, line 3171, in
e.affect()
File “C:\Program Files\Inkscape\share\extensions\inkex.py”, line 268, in affect
self.effect()
File “laser.py”, line 3155, in effect
self.orientation( self.layers[min(0,len(self.layers)-1)] )
File “laser.py”, line 3084, in orientation
doc_height = inkex.unittouu(self.document.getroot().get(‘height’))
AttributeError: ‘module’ object has no attribute ‘unittouu’
Hi Adam,
Was the acrylic you etched and cut transparent or solid? I have a similar laser setup and I’m having issues frosting clear acrylic. I can get a semi frost look with doing some tricks. I might need to paint it black first.
The acrylic was transparent, but the orange tint is intended to block the laser radiation. I suspect it absorbs much more energy which is why it cut so well.
I try to generate gcode using your inkspace (0.91pre3 r13670) extention but i gives a error:
Traceback (most recent call last):
File “laser.py”, line 3171, in
e.affect()
File “C:\Program Files\Inkscape\share\extensions\inkex.py”, line 268, in affect
self.effect()
File “laser.py”, line 3155, in effect
self.orientation( self.layers[min(0,len(self.layers)-1)] )
File “laser.py”, line 3084, in orientation
doc_height = inkex.unittouu(self.document.getroot().get(‘height’))
AttributeError: ‘module’ object has no attribute ‘unittouu’
First off, thank you for this post and the inkscape extension. This post inspired me to get a printrbot and laser from J Tech.
I’ve had the laser going a couple times now and engraving works as expected. Cutting on the other hand has not. Using the info you provided I attempted to reproduce the results with limited success. I should mention that I’m using 1/8 Birch Plywood.
I’ve done a good amount of googling about some of the settings in the extension you provided. The answers I’ve found are often very technical. Can you briefly explain the purpose of the following:
– Power on delay
– Pass depth
I’m also curios if you’ve developed in rules of thumb in working with the laser?
Thanks again!
hi,
is there any connection of the laser to the board?
The two-pin laser cable connects to the output of the laser driver. The input to the laser driver is split from the pwm fan output of the printrboard.